Thursday, November 14, 2013
Wednesday, September 25, 2013
Climate Change and Fashion Hackathon
On September 21st and 22nd 2013 a group of scientists, artists, and designers spent the weekend in the V&A Museum in London imagining future fashions in a world adapting to changing climates.

A design by Professor Helen Storey.

And another from Exeter College fashion students.

Ross tells a story, with his Peltier wrist band at the ready.
Some of the amazing items created by the teams.


Listen to the judges thoughts on this event.
On other blogs -
Hacking in front of an audience
Fashion Meets Climate Change at the V&A
Tuesday, September 24, 2013
Geohack at FOSS4G Mappingham
A week ago I was at Nottingham University with other from the Met Office hackathon team setting up tables, chairs, and the rest, ready for the two day Geohack geospatial hackathon. Of course the preparation for the event started months earlier as part of the even bigger effort of preparing for the FOSS4G conference. FOSS4G is an international gathering of open source geospatial developers, and although I wasn't able to stay for the whole conference several of my colleagues did and it seems like it was a really well organised and interesting event. There were certainly some great folks there judging from those who turned up a couple of days early to join the hackathon.
The hackathon was open to delegates and others who registered on the Geohack website. It was free to attended and you even got the traditional hackathon pizza and beer.
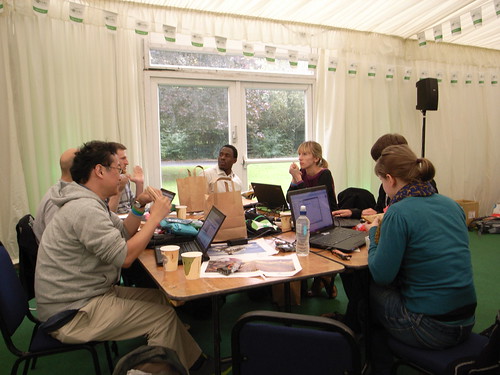

It was an international gathering, so I got to meet and hack with folks I wouldn't normally get to meet back home in Devon. Here I am with Willow Brugh and Steve Citron-Pousty doing that thing where everyone stares at their gadgets rather than have a conversation.
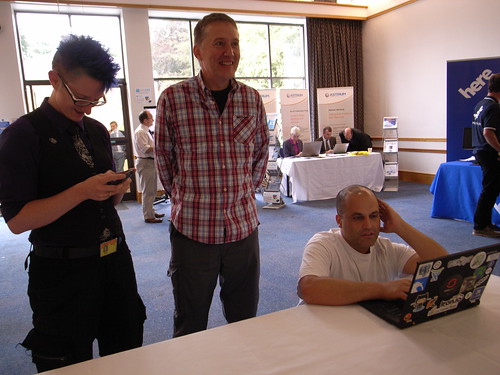 Seriously though, we had a good chat and hopefully we'll find more chances to work together if only for a couple of days. Once Steve got over his jet-lag, or more likely just learnt to live with it he got stuck in and managed to "sell" OpenShift as the solution most of the teams needed. He even found time to write a great blog post.
All the teams produced excellent work, and I wouldn't be at all surprised to see at least one or two turned into real services over the next few months.
So why didn't I stay for the whole of the excellent FOSS4G conference? Well I had another hackathon to go to - of course. More on that in the next blog post.
The hackathon was open to delegates and others who registered on the Geohack website. It was free to attended and you even got the traditional hackathon pizza and beer.
All the teams produced excellent work, and I wouldn't be at all surprised to see at least one or two turned into real services over the next few months.
So why didn't I stay for the whole of the excellent FOSS4G conference? Well I had another hackathon to go to - of course. More on that in the next blog post.
Sunday, September 08, 2013
Fashionably late - the Raspberry Pi bat phone

[ The reason I'll be busy is I'm doing two hackathons for my work, a geospatial hack - http://2013.foss4g.org/geohack/ and a fashion hack - https://climate.makes.org/thimble/climate-change-and-fashion-hackathon ]
Hardware list -
Bakelite telephone. The earpiece is the original one but the microphone was a carbon type so I replaced this with an electret capsule.
USB audio adaptor. These can be imported from China via ebay.
Toggle switch and microswitches. I've put a "sound/silent" toggle on the front, plus and LED with chrome bezel - all from the junk box. The "sound/silent" plate for the toggle switch is from an old cine projector.
MCP23008 port expander. To interface the switches and LED to the Raspberry Pi using I2C (SMBUS).
WiPi - wifi adapter.
5V PSU.
Other than a few bits of wire, stripboard and the odd connector and nuts and bolts that's about it.
More pictures -


Thursday, July 25, 2013
Cassette is not dead inspired Raspberry Pi case
This idea for a Raspberry Pi case came a couple of months ago when I saw this
 - it's from OOO My Design.
Other than a cassette tape all you need to make it is a few nylon standoffs, or spacers. I used nylon bolts too. On the base I added an extra bolt to create a third foot for it to stand on.


Other than a cassette tape all you need to make it is a few nylon standoffs, or spacers. I used nylon bolts too. On the base I added an extra bolt to create a third foot for it to stand on.


A short length of leader tape is used to keep the case square. Tie one end and use one of the cassette screws to fix the other end.

An extra bolt to the right provides a third foot.
Tuesday, July 23, 2013
8 pin MSP430 microcontroller - MSP430G2230
In earlier posts I've covered some experiments with NFC and UV sensors. I'm keen to take both these projects a little further and develop them into wearable devices. The Raspberry Pi and Ardunio are great for prototyping such things, but to make something the size of a button will require a surface mount microcontroller. At the weekend I came across the TI MSP430G2230, like the other MSP430 "value line" range these are very cheap low power 16 bit microcontrollers. Unlike the 14 and 20 DIL devices that are supplied with TI's incredibly cheap Launchpad these can't be plugged straight in. You'll need to either connect the programming lines to the SOIC chip somehow, or as I've done, build a couple of adaptors. The first adaptor makes the MSP430G2230 into an 8 pin DIL device, and the second makes the 8 pin devices match the pins of the typical 14 pin DIL MSP430.
In pictures -


As simple as that!
I've found that it can be programmed in CCS as either MSP430G2230 or MSP430G2231 - it's the same device, but with some of its pins not exposed to the outside world. The internal temperature sensor works fine, so I reckon my first project will be to use the I2C interface to log temperature measurements to an M24LR dual interface (NFC/I2C) EEPROM.
In pictures -


I've found that it can be programmed in CCS as either MSP430G2230 or MSP430G2231 - it's the same device, but with some of its pins not exposed to the outside world. The internal temperature sensor works fine, so I reckon my first project will be to use the I2C interface to log temperature measurements to an M24LR dual interface (NFC/I2C) EEPROM.
Sunday, July 14, 2013
Building a UV Index recorder for MSP430, Arduino, Raspberry Pi. Part 1 - the sensor
A couple of weeks ago I found this is Lidl.

I did what any right minded person would do - took it apart to see how it works.

OK, so modern electronic gadgets aren't easy to disassemble and reassemble. Thankfully I had no great desire to put it all back together again. One nice thing was that the UV photodiode was on its own board. One interesting thing is that there's a skeleton potentiometer so presumably these things are calibrated/adjusted at the factory.
Google led me to this manufacturer as the likely source of the photodiode http://www.eoc-inc.com/UV-detector-GaN.htm and here's the datasheet for a device designed for UV Index monitoring http://www.eoc-inc.com/genicom/GUVB-S11SD.pdf
Good news is that device current increases linearly with UV Index, bad news is it's measured in nano amperes. Well I suppose that does mean the resulting device could be very low current; given the application it might as well be solar powered!
First things first, I'm going to need an amplifier, so I went for a low power device I bought a few of a while ago but lacked the frequency response I needed, the TLV2252. Hooking this up on a breadboard with a circuit based on this one from http://www.ti.com/lit/an/sboa035/sboa035.pdf I used 10M resistors and a 3.3V supply.

Covering and exposing the photodiode did nothing, so I started thinking I'd damaged it or the circuit wasn't right. I swapped the UV photodiode for an LED and it worked like magic throwing the output to max when I directed a bright torch at it, so I swapped back the UV photodiode and went outside. Yes it worked giving about 20mV per UVI. OK, that's not a lot, but there's a second OP amp in the package so I used a 10K and 100K resistor to give extra gain of 10 and hey presto it's ready to interface to a ADC. As it is the circuit draws less than 0.2 mA.


I did what any right minded person would do - took it apart to see how it works.

OK, so modern electronic gadgets aren't easy to disassemble and reassemble. Thankfully I had no great desire to put it all back together again. One nice thing was that the UV photodiode was on its own board. One interesting thing is that there's a skeleton potentiometer so presumably these things are calibrated/adjusted at the factory.
Google led me to this manufacturer as the likely source of the photodiode http://www.eoc-inc.com/UV-detector-GaN.htm and here's the datasheet for a device designed for UV Index monitoring http://www.eoc-inc.com/genicom/GUVB-S11SD.pdf
Good news is that device current increases linearly with UV Index, bad news is it's measured in nano amperes. Well I suppose that does mean the resulting device could be very low current; given the application it might as well be solar powered!
First things first, I'm going to need an amplifier, so I went for a low power device I bought a few of a while ago but lacked the frequency response I needed, the TLV2252. Hooking this up on a breadboard with a circuit based on this one from http://www.ti.com/lit/an/sboa035/sboa035.pdf I used 10M resistors and a 3.3V supply.
Covering and exposing the photodiode did nothing, so I started thinking I'd damaged it or the circuit wasn't right. I swapped the UV photodiode for an LED and it worked like magic throwing the output to max when I directed a bright torch at it, so I swapped back the UV photodiode and went outside. Yes it worked giving about 20mV per UVI. OK, that's not a lot, but there's a second OP amp in the package so I used a 10K and 100K resistor to give extra gain of 10 and hey presto it's ready to interface to a ADC. As it is the circuit draws less than 0.2 mA.


Sunday, June 23, 2013
It's Not For Crows - more NFC dabbling
Back in March I wrote about some simple experimenting with the ST M24LR Discovery kit which feature a dual interface EEPROM - both NFC and I2C. That kit got me thinking about how I might use NFC to move data to and from low cost devices. Not just storing data on a tag, but mini data loggers and the like. So I ordered a few parts to experiment with and yesterday I finally got around to building some I2C/NFC tags. Here's one -
 I wound my own antenna. It this seems bizarre, consider that I grew up making crystal sets and the like - why would I miss the opportunity to wind a coil? For anyone wanting to do the same, it's 8 turns around a 4cm diameter former - in this case a plastic lid from a spice jar. Slip the windings off and apply a few dabs of hot glue and it's done. So far all I've done with this is read and write to it with my Nexus 7 tablet (NFC) and an Arduino Uno (I2C). With this EEPROM no power, indeed no connections, are required when using NFC, just the antenna coil.
There was no particular project in mind when I assembled the parts, which is why I included the 0.1" pitch connectors to plug them into a breadboard. What I notice once they were on the desk it that it's an ideal size to include in a Raspberry Pi case. So I built another slightly different one.
 This will fit inside the usual cheap type of case. Making this got me thinking about making a smaller one closer to the size of the pre-made tags you can buy but with the advantage of I2C. So I built this -
 The wire I used was Verowire, and the coil former is from the 1980s too. (12 turns on 2.2cm former)
 Yes, I reckon I'm going to build something gadgety into a cassette tape. Not sure exactly what, but pretty sure it will use an ultra low power MSP430 microcontroller.
As for the Raspberry Pi interface, what I'd like to do with that is use it to change settings that are loaded on rebooting - so I can set up Wifi access codes using a phone or tablet, ideal for a "headless Pi".

There was no particular project in mind when I assembled the parts, which is why I included the 0.1" pitch connectors to plug them into a breadboard. What I notice once they were on the desk it that it's an ideal size to include in a Raspberry Pi case. So I built another slightly different one.


As for the Raspberry Pi interface, what I'd like to do with that is use it to change settings that are loaded on rebooting - so I can set up Wifi access codes using a phone or tablet, ideal for a "headless Pi".
Monday, June 10, 2013
International Space Apps Challenge

What an amazing event! Described by some as "a contest" - science.nbcnews.com though conceived as a hackathon in the Random Hacks of Kindness model. See theatlanticcities.com for a different take.
Thanks to some incredibly enthusiastic and hard working colleagues the Met Office was able to host both Exeter and London events.
If you've never heard of hackathons or hack-days then most likely you don't work in IT, or you do, but don't surf the web, use social media, own a cat... please keep reading.
For those who work in IT and haven't been to a hackathon - it's like a free training course, with beer and good company. Why do I say it's like a training course? We'll it isn't really, but experience now tells me there's one type of IT guy (always a guy) it doesn't suit - the one that already, thinks he, knows everything.
For those who aren't IT experts, and more and more are coming to such events, a hackathon is a chance to meet some really cool people who like making digital stuff, and prefer prototypes over long winded presentations and reports. At a hackathon you'll see impossible ideas turned into amazing examples of digital genius.
What am I going to do next? We'll I don't have total control of anything much, but I'm always happy to share ideas and try out new things.
Now some quick notes to self -
- Back at the V&A in September. This may well become a "fashion hack", more on how we're working with the V&A in another post soon.
- Working with other organisations in the South West of England, Exeter and Plymouth Universities, DigPen. It's great that the Met Office was able to bring hackathons to Devon, but they really belong to the community and I want to find a way to hand them over, perhaps through sponsorship.
- On sponsors. Our events, including Space Apps have been supported by a few great sponsors. We're not selling advertising, we're encouraging others to be a part of what we are doing and they seem to get this. I'm sure there are other organisation out there who'd like to join the party.
What I'd really like to do - so will put some effort into, and yes do contact me if you'd like to help - is create events that wouldn't happen otherwise.
Saturday, April 06, 2013
Raspberry Pi and TI CC2541 SensorTag

Texas Instruments have yet another low cost development kit. The SensorTag is a Bluetooth Low Energy (BLE) key fob filled with the sorts of sensors that you'll find in the latest smartphone - pressure, temperature, humidity, accelerometer, gyroscope and magnetometer. See the SensorTag User Guide for full details.
If you're interested in experimenting with the SensorTag and you've got one of the latest iPhones, or iPads, then there's no need for you to be reading this, pop over to Texas Instruments SensorTag page and the ByteWorks blog. For Raspberry Pi and other Linux users I'll describe what I've figured out so far.
What you'll need
The hardware is really simple, in addition to the SensorTag which can be bought direct from TI post free, you'll need a BLE (aka Bluetooth 4.0) capable dongle. I'm using a Plugable USB-BT4LE which can be bought on Amazon. A PC running Linux - Ubuntu 12.10 seems to have everything needed as standard, and it was by testing on a laptop with the Plugable dongle I was able to prove to myself that the dongle and SensorTag both worked and would communicate. However, the rest of this post will be about using the RaspberryPi, because that's what I set out to make work.Software
This is my first RaspberryPi project so I started with a standard Raspbian "wheezy" image.Testing
Finding the SensorTag$ sudo hcitool lescan
LE Scan ...
90:59:AF:0A:A8:4E (unknown)
90:59:AF:0A:A8:4E SensorTag
ctrl c
Connect to the discovered tag
$ sudo hcitool lecc 90:59:AF:0A:A8:4E
Switch on a sensor and read its value
$ sudo hcitool lecc 90:59:AF:0A:A8:4E
Switch on a sensor and read its value
$ gatttool -b 90:59:AF:0A:A8:4E --interactive
[ ][90:59:AF:0A:A8:4E][LE]> connect
[CON][90:59:AF:0A:A8:4E][LE]> char-read-hnd 0x25
[CON][90:59:AF:0A:A8:4E][LE]>
Characteristic value/descriptor: 00 00 00 00
[CON][90:59:AF:0A:A8:4E][LE]> char-write-cmd 0x29 01
[CON][90:59:AF:0A:A8:4E][LE]> char-read-hnd 0x25
[CON][90:59:AF:0A:A8:4E][LE]>
Characteristic value/descriptor: a3 ff 7c 06
[ ][90:59:AF:0A:A8:4E][LE]>
The values 0x25 and 0x29 are "handles" that we either read from (0x25 holds the thermometer reading) or write to (0x29 must be set to a value of 01 to turn on the thermometer)
See http://processors.wiki.ti.com/index.php/SensorTag_User_Guide#Gatt_Server for details of the sensor handles. We can also ask the sensors to send a continuous stream of readings. To do this enter "char-write-cmd 0x26 0100", a value of 0000 will turn the stream off.
A working program
Having figured that out I wrote a simple python script that uses pexpect to drive gatttool. Grab a copy from github if you're interested.Building gatttool
I had to build my own copy of gatttool as the version included in wheezy wasn't able to write values to the sensor. To build bluez-5.2 you need to "apt-get install" the following - libglib2.0-dev libdbus-1-dev libusb-dev libudev-dev libical-dev systemd libreadline-devSee comment from Klaus Seiler on how to build.
Sunday, March 03, 2013
Internet of little things
Not for consumers
Yesterday I read Rory Cellan-Jones' article about NFC which pretty much shows that so far there isn't a consumer killer app for NFC. I'm not a professional pundit, so I'm not going to argue with him, but reading his article made me decide to do some first experiments.
Before Christmas I had an idea that low cost lower power data loggers could use NFC to send data to a mobile phone. I mean really low cost, pence, and really low power, like a watch battery. In fact a watch would be a good example of the kind of device I'm thinking of, it could be set to current time anywhere in the world just with a tap from a phone. More recently I saw that Farnell are now stocking the new ST M24LR Discovery kit, it costs a few pounds and features an energy harvesting NFC/I2C EEPROM and everything needed to read and write data, including an LCD display.

Learning with the Arduino
I'm an infrequent Arduino user as I feel cheap though it is, it's overkill for much of my tinkering. However it's an ideal system for experiments with I2C bus devices.Here's what I wrote. It's a fairly simple program that writes some text to the M24LR04E, which it then reads back. The text can also be read using an NFC phone, or the Discovery kit USB NFC transceiver. The program also reads the current temperature from the I2C temperature sensor included on the Discovery board.
// Use the Arduino to talk to ST M24LR-discovery board.
// Michael Saunby. March 2013.

#include <Wire.h> //I2C library

// Deviceaddress is a 7 bit value. i.e. the read/write bit is missing and the rest
// is shifted right.
// i.e. deviceaddress = 0x53 is sent by Wire as 0xA6 to write or 0xA7 to read.

// Dual interface (I2C+NFC) eeprom
#define M24LR04 0x53

// I2C temperature sensor - see table 1 of data sheet.  Resistor selects address.
#define STTS751 0x39

// See also -
// http://playground.arduino.cc/code/I2CEEPROM
// http://www.developer.nokia.com/Community/Wiki/Understanding_NFC_Data_Exchange_Format_(NDEF)_messages
//

void i2c_eeprom_write_byte( int deviceaddress, unsigned int eeaddress, byte data ) {
    int rdata = data;
    Wire.beginTransmission(deviceaddress);
    Wire.write((int)(eeaddress >> 8)); // MSB
    Wire.write((int)(eeaddress & 0xFF)); // LSB
    Wire.write(rdata);
    Wire.endTransmission();
}

void i2c_eeprom_write_bytes( int deviceaddress, unsigned int eeaddresspage, byte* data, byte length ) {
    byte c;
    for ( c = 0; c < length; c++){
        Wire.beginTransmission(deviceaddress);
        Wire.write((int)(eeaddresspage >> 8)); // MSB
        Wire.write((int)(eeaddresspage & 0xFF)); // LSB
        Wire.write(data[c]);
        Wire.endTransmission();
        delay(10);
        eeaddresspage++;
    }
}

// 03 | nbytes | D1 |01 | payload_length | type | id | payload | FE
// nbytes = payload_len + 4
// payload_length = ‘enSome text here \FE’
// type = ‘T’ (text), ‘U’ (URI)
// id = 02,  03 (http://)

void i2c_eeprom_write_ndef( int deviceaddress, unsigned int eeaddresspage, byte* data, byte length ) {
  // Write NDEF header
  char header[] = "\003\000\xD1\001\000T\002";
  header[1] = length + 5; // Total bytes after D1 marker.
  header[4] = length + 1; // Will add \xFE to payload.
  i2c_eeprom_write_bytes( deviceaddress, eeaddresspage, (byte *)header, sizeof(header) );
  i2c_eeprom_write_bytes( deviceaddress, eeaddresspage+sizeof(header)-1, data, length );
  i2c_eeprom_write_bytes( deviceaddress, eeaddresspage+sizeof(header)+length-2, (byte *)"\xFE\0\0\0", 4 );
}

byte i2c_eeprom_read_byte( int deviceaddress, unsigned int eeaddress ) {
  byte rdata = 0xFF;
    Wire.beginTransmission(deviceaddress);
    Wire.write((int)(eeaddress >> 8)); // MSB
    Wire.write((int)(eeaddress & 0xFF)); // LSB
    Wire.endTransmission();
    Wire.requestFrom(deviceaddress,1);
    if (Wire.available()){
      rdata = Wire.read();
    }
    return rdata;
  }

byte i2c_sensor_read_byte( int deviceaddress, int eeaddress ) {
  byte rdata = 0xFF;
  int rc;
  Wire.beginTransmission(deviceaddress);
  Wire.write((int)eeaddress);
  rc = Wire.endTransmission();
  Wire.requestFrom(deviceaddress,1);
  if (Wire.available()){
    rdata = Wire.read();
  }
  if(rc != 0){
    Serial.print("Error ");
    Serial.println(rc);
  }
  return rdata;
}

 void setup()
  {
    char message[] = "enHello World"; // data to write. N.B. language prefix 'en'

    Wire.begin(); // initialise the connection
    Serial.begin(9600);
    i2c_eeprom_write_ndef(M24LR04, 4, (byte *)message, sizeof(message));
    Serial.println("Setup done");
  }

  void loop()
  {
    int addr=13; // location of text string in NDEF payload.
    byte b, lo;
    signed char hi;
    float temperature;

    Serial.print(' ');
    while (addr<53)
    {
      b = i2c_eeprom_read_byte(M24LR04, addr);
      if(b == 0xFE)break;
      Serial.print((char)b);
      addr++;
    }
    Serial.println(" ");

    // read temperature
    hi = i2c_sensor_read_byte(STTS751, 0);
    lo = i2c_sensor_read_byte(STTS751, 2);
    if( hi > 0){
      temperature = hi + lo * 1.0/256.0;
    }else{
      temperature = hi - lo * 1.0/256.0;
    }
    Serial.print(temperature);
    Serial.println(" ");
    delay(1000);
  }
Lessons learnt
- Read the data sheet. When it doesn't work, read it again.
- Wire uses I2C_device_address / 2. It that makes no sense, compare datasheet addresses with those used in the code. Yup, that caught me out.
- The onboard microcontroller can be disabled with a jumper on reset. But it's not necessary, two masters works in this case as the default ST code only reads.
- NDEF - yet another data format. Yipee!
What next?
Now I've figured out how to use these NFC EEPROMs I've ordered a few chips, they're less than a pound each. Of course I'll need to make my own antenna, but that should be easy and fun. For the microcontroller I'll use the absurdly low power and very cheap MSP430.
Oh, and if you want to create your own Internet Of Little Things, then I suggest as a minimum you edit the code to write a URI to the EEPROM, then hey presto, you're little thing is on the Internet, sharing it's temperature, or whatever else it wants to share.
Subscribe to:
Posts (Atom)